A Little About Me

New York, New York
As a newly married woman, it has become my mission in life to learn how to cook. Gone are the days of picking up sushi and ordering curries. In order to jump-start my education, I enrolled in the Institute of Culinary Education's Fine Cooking I course where I learned the basics, from roasting to boiling to mousse-making (ok, maybe not that basic)! I've attempted to replicate some recipes - somewhat successfully- and create a few of my own. This blog is for friends and foodies and is intended to document my cooking adventures (and occasional fiascoes). Enjoy the pictures and bon appetite!

Tuesday, December 14, 2010

Spiced Pumpkin Bread

Saturday morning, I was up before 8:00 and thought it would be nice to surprise my husband, who was in a coma-like sleep, with something sweet and homemade for breakfast. Since it was way too cold to run out to the market, I decided to use a recipe that called for ingredients already in the pantry. I remembered another blogger having posted a recipe for a spiced pumpkin loaf he had found on Epicurious and thought I'd try it out too. The bread was moist and delicious, almost cake-like, and my husband couldn't get enough of it (once he woke up, that is).

Ingredients
1 1/2 cups sugar
1/2 cup vegetable oil
1 1/2 large eggs
3/4 16-ounce can solid pack pumpkin
1 1/2 cups all purpose flour
1/2 teaspoon ground cloves
1/2 teaspoon ground cinnamon
1/2 teaspoon ground nutmeg
1/2 teaspoon baking soda
1/4 teaspoon salt
1/4 teaspoon baking powder
1/2 cup chopped walnuts

Preheat the oven to 350 degrees F. Grease and flour a 9x5x3-inch loaf pan. (aka, coat with butter, then sprinkle with flour and shake off excess).

In a bowl, combine sugar and oil. Add in the eggs and canned pumpkin.

Slowly mix in flour then cloves, cinnamon, nutmeg, baking soda, salt and baking powder.

Add chopped walnuts.

Pour into the loaf pan and bake for an hour and ten minutes.

Remove and let cool...

for some really deliciously moist and dense cake/bread...


Thursday, December 9, 2010

"Hannukah" Brussel Sprouts

For some reason, my husband insists that potatoes fried in oil does not equal a 'complete dinner.' While I'd be happy consuming twenty latkes and calling it a night, I opted to make a vegetable side dish for my husband and our Hannukah guests. I decided to make some brussel sprouts with toasted almonds and cleverly incorporated some of the oil used to fry the latkes in order to make them exceptionally tasty!

Ingredients
1/2 lb brussel sprouts
1/4 cup slivered almonds
salt and pepper to taste
1 tbsp olive oil
vegetable oil from latke pan

Start by toasting the almonds. To do, this, heat a dry pan over medium heat. Toss in the almonds and keep them moving until they begin to brown.

Once toasted, remove and set aside.

Heat the olive oil in the same pan and toss in the brussel sprouts. I like to slice mine in half for quicker cooking and easier consumption.

Season with salt and pepper and, after a couple minutes, add the toasted almonds back in. In order to make the whole dish a little tastier, take a couple spoonfuls of the vegetable oil used to fry your latkes and drizzle over the brussel sprouts. This will add a really nice depth and unique flavor.

Continue to cook for a couple more minutes, or until the outer leaves of the brussel sprouts begin to brown. Remove and serve immediately!


Tuesday, December 7, 2010

Oh yes, I did! Happy Hannukah!

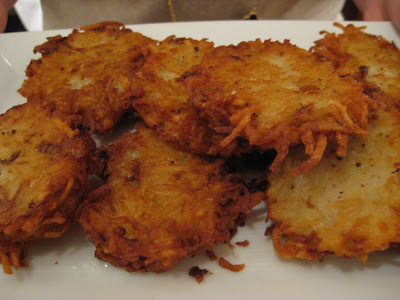
Despite all the cooking I've done, I've never actually made latkes for Hannukah before. I think it was all the oil splattering everywhere that kind of freaked me out a bit. Growing up, I watched my mom slave away all afternoon making latkes for my sister and I, so I figured I should try to perfect the art of latke making for when I have my own two little ones running around :) Thanks to my mom's Google skills, I was armed with an array of articles detailing the proper cooking techniques and, thanks to my friend Jenna, a great recipe to go off! With my sister's help, the latkes turned out just like the ones my mom used to make us and my apartment still smells like grease today; mission accomplished!

Ingredients
5 lb bag of Russet potatoes
1 large or 2 small onions
3/4 to 1 cup flour
1 tsp baking powder
1 1/2 tsp salt
1 tsp black pepper
vegetable oil for frying

The first step in latke making is peeling and shredding your potatoes. This can be tricky because potatoes turn black once exposed to the air. Since we wanted to do a lot of the prep work earlier in the day, I made my sister stand there and peel the entire bag of potatoes, cut them into thinner pieces (easier to get into the food processor that way), and let them soak in a bowl of cold water until they were ready to be shredded that evening.

While the potatoes were soaking, we readied the remainder of our ingredients. Using the food processor, we shred one large onion and set it aside. We also measured out the dry ingredients and bet the eggs so we could quickly mix it all together later on.

Right before you're ready to make the latkes, shred the potatoes. Once done, remove as much liquid from the potatoes as possible. This took my sister and I a good 15 minutes, an entire roll of paper towel and a strainer!

Once the potatoes are dry enough, mix in the eggs and dry ingredients. The recipe originally called for 1/2 cup of flour but I ended up adding about another half to make the mixture a little drier... resulting in latkes that weren't soggy and greasy.

Heat about 1/4 inch of canola oil in a heavy duty pan or skillet and let it get really hot. Test out the temperature by dropping a small amount of the latke mixture in and seeing if it turns brown within a minute. Once your oil is hot enough, scoop some of the latke mixture using 1/3 cup measurement and drop it in.
Flatten with a spatula and let them cook a couple minutes on each side, or until brown and crispy. Remove and drain the latkes on a paper towel immediately.

Serve with sour cream and apple sauce. Happy Hannukah!


Thursday, December 2, 2010

Ice Cold Piraguas

A trip to Puerto Rico wouldn't be complete without a walk through the old city, and a walk through the old city wouldn't be complete without an ice cold piragua! Piraguas are made by shaving a big block of ice, molding the shavings into a cone shape and dousing with sweet, tropical flavored syrups. A piragua is the most refreshing thing you could ask for when the sun is beating down on your shoulders and I love the exotic flavors like tamarindo, guanabana and acerola that you can't find in New York very often!

Lots of flavors to choose from, some more exciting than others...

Piragua man, hard at work shaving ice...

My piragua, a combination of guanabana and tamarindo...

I really enjoyed it and almost bought another :)


Tuesday, November 30, 2010

Puerto Rican Pastries

Happy belated Happy Thanksgiving, everyone! I was lucky enough to spend the past week visiting my parents in Puerto Rico which meant lots of sun, beaching and nostalgia-inducing foods from my childhood on the island! Since I didn't have the opportunity to do much cooking (except for the usual breakfast items), I'd thought I'd share a few photos of my favorite snacks this week!

On our last day, we stopped by Kasalta, an old-school bakery that's been around for as along as I can remember.... I have memories of my grandparents taking my sister and I there for breakfast. Some of my favorite pastry items at Kasalta include quesitos, or sweet cheese-filled pastries, and mallorcas, sweet flaky pastries served toasted. These treats aren't something I've been able to find easily in NYC, so I have to tell you that I really enjoyed and savored every sweet bite!

A sweet glazed quesito...

with a cream cheese filling.

A toasted mallorca, doused in powdered sugar...

with delicious fluffy pastry layers.

Too bad we had to share!

Saturday, November 20, 2010

Onion Soup... Not the Hardest Thing to Make After All

Anyone who knows my sister knows that onion soup is one of her two ultimate favorite foods. So, when she asked me to help her prepare a romantic meal for her boyfriend, I naturally thought of onion soup. At first, the thought was a little scary... in my mind, the soup always seemed like something rather complicated to assemble (creating a savory broth, melting all the ingredients just right, etc...) but I was able to find and tweak a simple recipe that resulted in an impressive onion soup that my sister and her man both enjoyed.

Ingredients
3 tbsp olive oil
1 tbsp butter
2 large Vidalia onions, sliced
1 tsp kosher salt
1/2 tsp black pepper
1/2 tsp garlic powder (or 1 clove garlic, diced)
1 tsp fresh thyme, chopped
4 cups beef broth
2 slices ciabatta bread, cut in half
4 oz shredded gruyere cheese
2 ovenproof ramekins

Start by heating the olive oil in a large pot and adding the sliced onions, salt, pepper and garlic powder/clove. Cook until the onions are tender, about 10 to 15 minutes.

Add the thyme, butter and broth, and let simmer for another 15 minutes. This will probably make your kitchen smell really yummy.

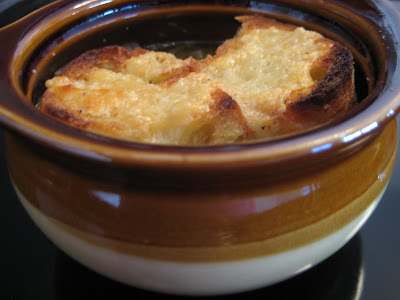
Spoon the soup into an ovenproof ramekin or an onion soup bowl. Slice some ciabatta and place in the soup, then cover with a good helping of sliced gruyere cheese. Drizzle with a lot olive oil and season with a dash of salt and pepper. The soup in this photo was kind of a test run.... lots more cheese was added to the actual eaten version.

Place under the broiler for 5 minutes, or until the cheese starts to brown and the bread crisps up a bit. Be sure to watch it so it won't burn. A couple extra minutes under a broiler can really ruin a meal!

Serve immediately and try not to burn the roof of your mouth on the hot gruyere.


Wednesday, November 10, 2010

A Protein Packed Snack

I've been a little tired lately and have been turning towards protein-packed snacks to keep my energy level up. Since there's only so many hardboiled eggs a girl can eat, I thought I'd try to make a tofu satay... one of my favorite thai takeout items! This dish packs a double punch since you get protein from both the tofu and peanut butter. Using a variation of a peanut salad dressing I've posted before, I threw together a simple satay sauce and was able to do everything in under ten minutes!

Ingredients
firm Tofu
2 tbsp peanut butter
2 tsp soy sauce
2 dashes sriracha hot sauce (more if you like spice)
water to dilute, as needed
1 tbsp canola oil

In order to prepare your tofu, remove it from the package and place it on a few layers of paper towel. Cover with a few more layers and place something heavy on top in order to squeeze out excess moisture. Let sit for five minutes before cutting into large cubes.

Heat the oil in a pan over medium high heat and place the tofu in the pan. Allow each side to cook for a minute or two, or until golden brown.

When the tofu has cooked on both sides, remove and prepare the satay sauce by combining the peanut butter, soy sauce and sriracha. If the sauce is a little thick, add a bit of water to dilute. Because peanut butter is so thick, I like to cover my container and give it a really hard shake so that everything incorporates well. Pour over the tofu and enjoy your snack!


The Incredible, Edible, Egg Salad Sandwich

While I've posted all sorts of fancy things on here, I'm embarrassed to say I had never boiled an egg up until this weekend. While seemingly simple, boiling an egg used to freak me out because every recipe I read gave a different boiling time and way of doing it. With my husband's help - and a ruined egg or two - we finally figured out a way to make the perfect hard boiled egg, which I then made into a delicious egg salad. I used my dad's basic recipe and my father-in-law's suggestion to add cooked scallions and ended up with an entire tub of amazing egg salad!

Ingredients
7 eggs
1 tbsp low fat mayo
1 tbsp regular mayo
1 tsp mustard
1/2 bunch of scallions, chopped
salt and pepper

My way of obtaining the perfectly cooked hard boiled egg: Place the eggs in a pot and cover them with cold water. The water should rise an inch above the eggs. Bring to a boil over medium heat and let the eggs boil for five minutes, then turn off the heat and let them sit in the hot water for another 5 minutes. Remove the eggs and run under cold water to stop the cooking process.

Softly smack the egg on a hard surface to crack the shell and peel. (Running the egg under cold water as you peel will help the shell come off easier.)

Chop up a bunch of scallions and saute them in olive oil until wilted. Set aside.

Combine the mayo, mustard, salt and pepper. Since mayo can be high in fat, I used a combination of regular and low fat mayos. You can use all full-fat mayo, but I wouldn't recommend using only low fat because it just won't taste as good.

Lastly, chop the eggs with a knife and combine with the mayo and scallions.

Mix well and serve on some toast, or in a lettuce cup! This truly is an incredible, edible, egg salad sandwich!


Monday, November 8, 2010

Indian Style Shrimp in Coconut and Tomato Sauce

If you ask my husband, he'd probably tell you that I've been OBSESSED with Indian food lately. Being the great husband he is, he actually put up with me wanting to order dinner from the same restaurant (Haveli) five nights in the same week. Since he was so giving, I offered to cook him an Indian dinner one of the nights... a win-win situation seeing as how I got some Indian and he got something that tasted different than the usual chicken curry! Just a note, this recipe called for the addition of 5 seeded green chiles, but I couldn't find them at the market and wasn't in the mood for a spicy dinner, so add them if you dare!

Ingredients
1/4 cup vegetable oil
2 tsp mustard seeds
2 tsp cumin seeds (or ground cumin)
1 1/2 cups finely chopped red onion
3 tbsp minced ginger
2 tbsp minced garlic
1/4 cup tomato paste
1 can diced tomatoes (14.5 oz)
1 can unsweetened coconut milk (13.5 oz)
1 1/2 lb shrimp, peeled and deveined
2 tsp salt
1/4 fresh cilantro, chopped

Start by washing, preparing and pre-measuring ingredients. Having things ready beforehand will make things easier once you start cooking.


Heat the vegetable oil in a saute pan over medium heat. Add the mustard seeds and cumin and saute for a couple minutes. Next, add the onions, ginger and garlic and cook until the onions have caramelized, about 7 minutes.

Add the tomato paste and cook for a couple minutes before adding the diced tomatoes.Cook until everything has reduced by half.

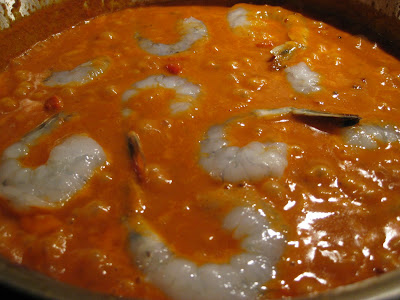
Raise the heat to high and add the coconut milk. Warning: possible splattering, stand back! Cook until reduced by half then add the shrimp the to the pan. Make sure to season with the salt before adding. Cook for about 5 minutes, stirring often, until the shrimp has turned pink.

Add the chopped cilantro, mix and serve.

The shrimp goes well with basmati rice. I used some coconut milk to make the rice and added some coconut shreds for a little extra flavor and texture. See, who needs Indian takeout when you can make this for dinner?