A Little About Me

New York, New York
As a newly married woman, it has become my mission in life to learn how to cook. Gone are the days of picking up sushi and ordering curries. In order to jump-start my education, I enrolled in the Institute of Culinary Education's Fine Cooking I course where I learned the basics, from roasting to boiling to mousse-making (ok, maybe not that basic)! I've attempted to replicate some recipes - somewhat successfully- and create a few of my own. This blog is for friends and foodies and is intended to document my cooking adventures (and occasional fiascoes). Enjoy the pictures and bon appetite!

Wednesday, February 22, 2012

Balsamic Glazed Scallops over Spaghetti Squash

Over dinner recently, my good friend Lisa was telling me about the amazing spaghetti squash pasta she made for her (very lucky) husband. She inspired me to try an ingredient I had not only barely ever eaten, let alone made at home! For some reason, scallops just seemed like the perfect protein to pair with the squash and I was excited to be cooking two new items for the first time. Lisa, you'd be proud, the dish came out de-li-cious!

Ingredients (makes 1 serving)
1 spaghetti squash
3 scallops
6 tbsp balsamic vinegar
2 garlic cloves, diced
1 tbsp olive oil
1 tbsp butter

Start by preheating your oven to 375 degrees. With a fork, prick your spaghetti squash all over and then place in the oven for about an hour and a half until the skin is really soft. Some recipes will tell you to slice the squash open before you place it in the oven, but I found that IMPOSSIBLE to do, so just throw it whole.

Remove the squash and let it sit for ten minutes before cutting in half.

Scoop out the seeds and middle then spoon out the stringy spaghetti portion and set aside.

Rinse the scallops then toss with garlic and balsamic vinegar.


Heat up the olive oil and butter in a frying pan then sear the scallops for 3 minutes on each side.


When the scallops are cooked, set aside and toss in the rest of the balsamic vinegar and garlic, letting it simmer until the alcohol has dissolved and the sauce thickens.

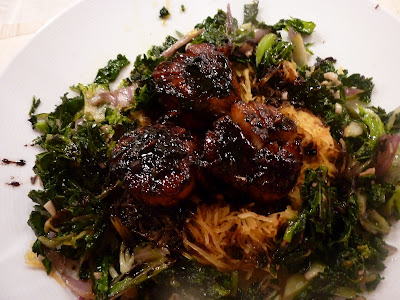
Prepare something green to serve alongside the scallops and squash, because every meal should have something green in it! For this dish, I prepared some sauteed mixed kale with garlic.

Place the scallops over the spaghetti squash and drizzle with lots of the balsamic glaze. This dish will impress anyone, especially you, with how little effort and time went in to making it!


Sunday, February 12, 2012

Blueberry Muffins

I've been baking. A lot. I have to say, cooking is a lot easier than baking because there's room for modification and experimentation. When it comes to baking, there's a recipe and you follow it. However, if you have the right recipes, baked goods can be pretty delicious. I had a bag of frozen blueberries on hand the other day and thought whole wheat blueberry muffins sounded interesting and difficult to screw up. I was right. With the addition of some lemon zest and sour cream, these muffins were tangy and delicious!

Ingredients
5 tbsp unsalted butter, softened
1/2 cup sugar
1 large egg
3/4 cup sour cream
1/2 tsp grated lemon zest
1 1/2 cups all-purpose flour
1 1/2 tsp baking powder
1/4 tsp baking soda
1/4 tsp salt
3/4 cup fresh or frozen blueberries

Start by preheating your oven to 375 degrees and using butter to grease your muffin tins.

Beat the butter and sugar with an electric mixer until light and fluffy. Add the egg and beat well, followed by the sour cream and lemon zest. Combine the flour, baking soda, baking powder and salt separately then add into the mixture, little by little, combining with the mixer until well-incorporated. Gently fold in the blueberries.

Scoop the mixture into the muffin tin, filling about 3/4 of the way up. Bake for about 25-30 minutes or until the muffins have browned on top.

Let them cool and enjoy with a cup of coffee for breakfast!


Tuesday, January 17, 2012

Turkey Enchiladas

I love, love, love Mexican food! Unfortunately, I don't eat it as often as I like because it can really pile on the weight. I decided to try and make my own enchiladas recently, only I swapped the chopped beef for ground lean turkey which I am sure saved me a lot of calories! The enchiladas were both healthy and tasty and honestly, so easy to make!

Enchilada Ingredients
4 flour tortillas
1 can pre-made enchilada sauce
1 lb ground lean turkey
22scallions, diced
1 small onion, chopped
2 garlic cloves, diced
1/2 jalapeno, seeded and chopped
1 tomato, seeded and diced
1/2 tbsp cumin
1/2 tbsp coriander
1/2 tbsp paprika
pinch of cayenne pepper
handful of shredded cheddar cheese
1 can refried beans
2 tbsp olive oil

Heat the olive oil in a pan then toss in the onions, 2 of the scallions and tomatoes. Saute for a few minutes, or until onions are translucent. Add in the ground turkey and spices, and mix until the meat has cooked through. While everything is cooking, preheat your oven to 350 degrees.

Spread about 3/4 of a cup of the enchilada sauce on the bottom of a baking dish. Take the first tortilla and dip it in the sauce, then flip and dip the other side. Spoon about 1/2 - 3/4 cup of the turkey into the middle of the tortilla, roll it up and move to one end. Repeat with the next three tortillas as well. You'll also want to spoon some of the enchilada sauce on top of the rolled up tortillas.

Sprinkle some of the cheddar cheese on top, glob on a few spoonfuls of refried beans here and there, then sprinkle with the remaining scallions.

Pop in the oven and bake until the cheese has melted and the insides have heated up, about 15 minutes. You can serve with some sliced up avocados or guacamole, some reduced fat sour cream and diced tomatoes!

Sunday, January 8, 2012

Yummy Meatballs

I've always wanted to make meatballs, but for some reason I've been intimidated. I just thought it would be difficult to not only make them, but make them well. Meatballs are great because it lets you indulge your red meat craving without having to consume an entire steak or burger. I found a recipe and gave them a shot and was pleasantly surprised at how good they came out! Just a warning, don't make these in advance and let them sit out too long... and don't reheat them in the microwave, or they will dry out (which I did for my husband who got home late the night I made them). Enjoy!

Meatball Ingredients
1/2 lb ground veal
1 lb ground beef
2 large eggs, beaten
1/3 cup grated parmesan
4 cloves finely chopped and sauteed garlic
1/4 cup panko bread crumbs
1 tbsp chopped oregano
salt and pepper

This recipe was so easy to make! Simply combine all the ingredients in a bowl...

roll the mixture into 1 1/2 inch balls....

heat some olive oil in a pan over medium heat and fry until the meatballs are fully cooked.

You'll need to turn them around with tongs to make sure all sides cook.

When the meatballs are done, you can eat them plain or toss them over some spaghetti with marinara sauce!


Saturday, January 7, 2012

Tuna Burgers with Wasabi Aioli and Asian Slaw

Burgers have kind of become my thing. I love experimenting and making lots of different kinds, like turkey burgers, lentil burgers and chicken apple burgers! I find it fun to experiment with different proteins, seeing what kind of combinations I can come up with! Right before the new year, I decided to try my hand at tuna burgers, since I always love them in restaurants. They came out yummy, but it's not the cheapest protein to turn into a burger! I also made some wasabi aioli and awesome asia slaw to serve with it... the result was a very satisfied husband :)

Burger Ingredients
1 lb sushi grade ahi tuna, chopped
2 tbsp cilantro, finely chopped
4 tbsp low sodium soy sauce
2 tbsp honey
1 tbsp black sesame seeds
2 scallions, chopped
1 tbsp toasted sesame oil

Start by chopping up the tuna, until it's pretty smooth. In a bowl, mix the tuna with the cilantro, soy sauce, honey, sesame seeds, scallions and sesame oil.

Form the mixture into patties and cook in a pan with olive oil over medium heat until the burgers have seared on the outside and remain a little rare on the inside. Be careful, it's easy to overcook them, but they'll be a lot more tasty and moist if left a little pink in the middle.

Wasabi Mayo Ingredients
3 tbsp mayo (regular or low-fat)
1/2 tbsp wasabi paste
juice of 1/2 lime

For the mayo, simply mix all the above ingredients together in a bowl!

Slaw Ingredients
1 carrot
1/2 red bell pepper
1 cup red cabbage
1/4 cup cilantro
4 scallions
3/4 tbsp minced garlic
1 tbsp minced fresh ginger
1 1/2 tbsp soy sauce
1 1/2 tbsp brown sugar
2 1/2 tbsp creamy peanut butter
3 tbsp vegetable oil
3 tbsp rice vinegar

This slaw is so easy and so tasty! Just cut the carrots, scallions and peppers into thin matchsticks and chop up the cilantro, ginger and cabbage. In a separate bowl, combine all the liquid ingredients to make the dressing and then pour over all the vegetables. I recommend combining closer to serving time otherwise the slaw might become wilted.

Top the tuna burgers with some wasabi mayo and serve alongside a big heaping of slaw!


Tuesday, December 6, 2011

Lemon Ricotta Cakesters

It seems I've been bitten by the baking bug lately! Since I usually send my husband lunch, it's nice to have the occasional home baked good to toss into the lunch bag! I was watching the Food Network recently and saw Giada whipping up a batch of these yummy looking lemon ricotta cookies, so I just had to try them! They tasted great but I was under the impression they'd be "cookies" whereas their softer texture made them a little more like cake than cookies. Either way, they were refreshingly unique and a nice change from the usual banana bread repertoire!

Cookie Ingredients
2 1/2 cups all-purpose flour
1 tsp baking powder
1 tsp salt
1 stick unsalted butter, softened
2 cups sugar
2 eggs
1 15 oz container whole milk ricotta cheese
3 tbsp lemon juice
zest of 1 lemon

Glaze Ingredients
1/2 cup powdered sugar
3 tbsp lemon juice
1 lemon zest

Start by preheating the oven to 375 degrees. In a bowl, combine the flour, baking powder, salt and set aside. In another bowl, combine the butter and sugar and beat with an electric mixer until light and fluffy, about 3 minutes. Add the eggs, one at a time and beat until well incorporated. Then, add the ricotta, lemon juice and zest and combine.

When combined, add in the dry ingredients. Line 2 baking sheets with parchment paper and spoon the dough on in 2 tbsp size portions. Bake for 15 minutes, remove and let cool for another 20 minutes.

Make the glaze by mixing the powdered sugar, lemon zest and juice until smooth. Spread about 1/2 tsp onto each cookie and let harden before enjoying!


Sunday, November 20, 2011

Goat and Gruyere Quiche

A couple of weeks ago, we had a few friends over for brunch. Besides the usual spread of bagels, lox and fruit, I felt there had to be something homemade on the table. (Especially since I have a cooking blog!) I decided it had to include some yummy cheeses so I could go harass the guy at my local market's cheese counter for samples! I decided a Gruyere and Goat cheese quiche with mixed vegetables would be unique and showcase all the yummy cheeses I bought! The quiche was a success and, so easy, it's now one of my brunch "musts."

Ingredients
2 tbsp unsalted butter
1 cup chopped yellow onions
1/4 lb mushrooms, sliced
1 bunch of asparagus, cut into chunks
1 tsp minced garlic
3 tbsp chopped fresh basil
2 tsp chopped fresh thyme
1/2 tsp salt
1/4 tsp fresh ground pepper
1 1/4 cups half-and-half
1/2 cup grated Gruyere
1/2 cup crumbled goat cheese
1/2 tsp crushed red pepper
3 large eggs
pre made pie crust

Start by preheating the oven to 375 degrees and chopping your vegetables.


Melt the butter in a skillet over medium-high heat and add the vegetables. Cook until the vegetables have wilted, about 8 minutes. Add the garlic and cook for another minute. Add the fresh herbs and season with salt and pepper. Remove from the heat and let cool.

In a bowl, beat together the eggs and half-and-half, then season lightly with salt and pepper. Add the Gruyere and crushed red pepper.

Spoon the cooked veggies into the pie crust.

Pour the liquid mixture over the veggies and crumble the goat cheese on top. Bake for 30 minutes, or until set.

If you plan on serving this the next day, just heat in the oven for 10 minutes at 350 degrees since it's best served warm!


Friday, November 18, 2011

My Favorite; Carrot Cake

I've always big a BIG fan of carrot cake, particularly because I love the frosting! (I've actually bought a slice just to lick off the frosting!) This week, I decided to take a break from baking the usual chocolate chip banana bread my husband lives for and try my hand at my favorite. My carrot cake came out really delicious and disappeared way faster than I could have imagined! Note, the recipe posted below is meant for a larger cake, which requires making, stacking and frosting three separate cakes to form a layered carrot cake. I modified the recipe and used 2/3 of all the ingredients to make a single, larger, cake.!

Cake Ingredients
Butter for greasing baking pan
2 cups all purpose flour
2 cups sugar
2 tsp baking soda
2 tsp cinnamon
1 tsp salt
4 eggs
1.5 cups vegetable oil
3 cups grated carrots
1 cup chopped pecans
4 rings canned pineapple, cut into chunks

Start by preheating the oven to 350 degrees and grease a 9 inch pan with some butter. In a large bowl, combine the flour, sugar, baking soda and salt

Blend all the ingredients with a handheld mixer.

Add the pineapple, carrots and pecans. Pour into a greased 9 inch pan and bake for 40-60 minutes or until browned on top. I say 40-60 minutes because everyone's oven is different and while the original recipe called for 40, mine required an hour. Some may need more time than others.
Frosting Ingredients
2 8oz packages of cream cheese, room temp
1 stick unsalted better
powdered sugar, to taste
1 tsp vanilla extract

To make the frosting, whip together all the ingredients in a bowl. I don't specify the amount of powdered sugar because the original recipe calls for what I think is way too much, plus, people have different palettes for sweetness. I'd mix the other ingredients together and then go adding one tbsp of sugar at a time until it reaches the level of sweetness you're comfortable with.

Once the cake has completely cooled, spread the frosting all over the cake.

You'll watch this cake disappear quickly, trust me! Mine did :)